Documents, Signatures & Approvals
How to add approval, document generation, e-signature and assignment steps to a workflow, and what each one asks of the people involved.
Which step does what
FormAssembly has four step types for turning a response into a document, a signature or a decision:
- Document generation merges collected data into a Word (.docx) or PowerPoint (.pptx) template and produces a PDF. It is available on every plan.
- E-Signature asks one person to sign one generated document in the browser. It is available on every plan.
- Approval asks one person to approve, deny or return a response for changes. Approval steps need the Automate plan or the Enterprise plan.
- Assignment hands part of the workflow to someone else, such as a signer or an approver, and waits for them. Assignment steps need the Automate plan or the Enterprise plan, with one exception: on the Collect plan a workflow can hand one e-signature to one signer (one assignment step, run once, whose sub-workflow is a single sign step, with no other sign step in the workflow).
On the Collect plan, a workflow has one signer: the respondent, or the one person they hand the form to. On the Collect plan the Add step menu inserts that single e-signature hand-off when the workflow still fits it, and otherwise opens the upgrade prompt.
All four tiles sit in the Collect group of the Add step menu, which you open from Focus view in the workflow builder. To add and edit steps, see Building Workflows. Fai, FormAssembly's AI assistant in the builder, can set up any of these four steps for you.
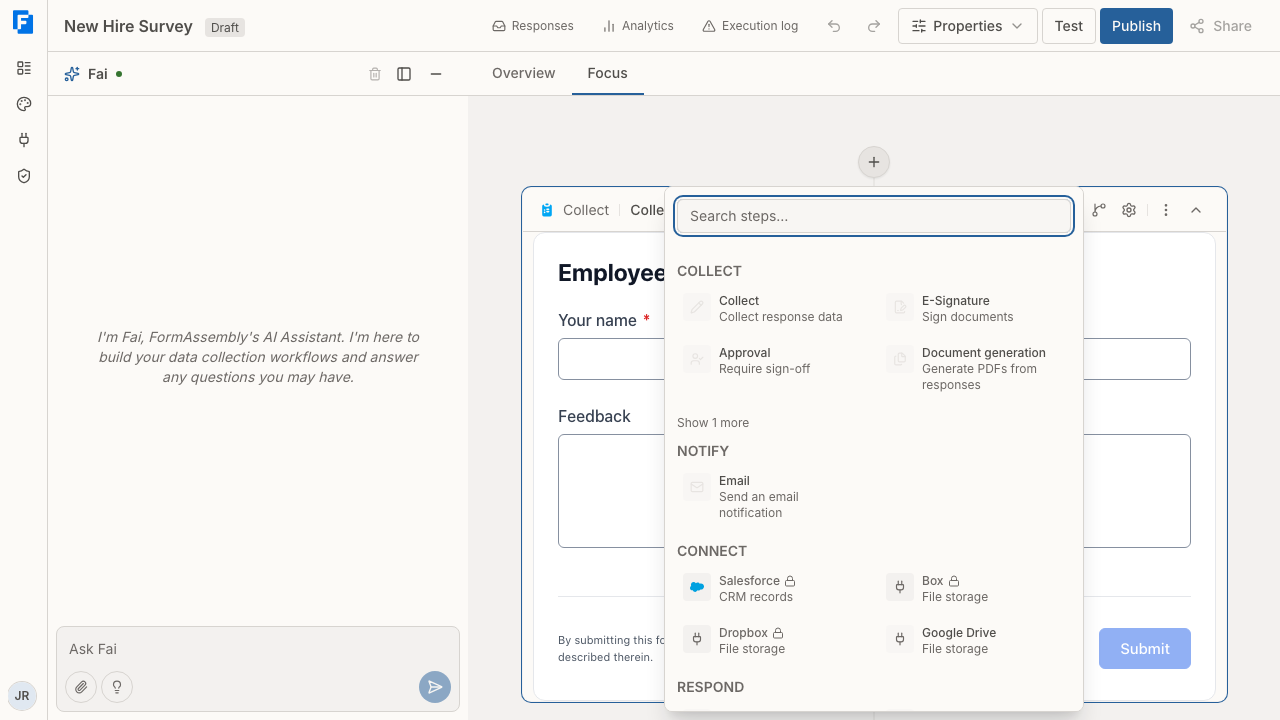
Document generation
How do I add a document generation step?
- Open your workflow and switch the builder view to Focus.
- Click Add step where you want the document produced, after the data it merges.
- Choose Document generation in the Collect group.
- Open the step's panel and attach a template.
You can also ask Fai to add and configure the step: type your request in the chat box ("Ask Fai") and click the send button.
The step produces a PDF, named after the template, which appears on the response. A later Salesforce step can upload that PDF. A failure path is optional.
Attaching a template
In the step's panel, the Template section uploads, replaces and downloads a .docx or .pptx file of up to 10 MB. With no template attached, FormAssembly offers Generate and Upload side by side: Generate builds a .docx from the collect steps that precede the step, so you have a starting document to restyle in Word. Regenerating replaces the file and every mapping, so FormAssembly asks you to confirm first.
The step refuses legacy .doc and .ppt files with the message "Template must be a .docx or .pptx file." In the guest builder the template cannot be uploaded or generated from the panel.
Replacing the template keeps every mapping: a row whose tag is gone shows No longer exists until you clear it, and new tags arrive as empty rows.
Mapping the template's merge fields
The tags in a document template are called merge fields, and the panel lists one row per merge field the template declares. The panel shows only the sections your template needs:
- Field mapping binds each text merge field to a form field, a variable, a formula or a literal value. A merge field with no value renders blank and does not block publishing.
- Conditional content binds each boolean merge field to a field or variable, a typed value, or conditions. Click Set conditions instead under a row to build the conditions with Match All, Match Any or Custom.
- Repeated content binds each
{{loop name}}block to a repeating form section. Nested loops bind to the repeating sections inside the parent loop's section. - Signature fields lists the template's signature merge fields read-only, grouped by role. Sign steps fill them, so you cannot map them yourself.
Return document data to the workflow
The Return document data to the workflow section captures properties of the generated PDF into variables for later steps. It offers Private URL, Storage path and Size (bytes). The section is optional and starts collapsed.
To attach the PDF to an email or upload it to storage, point the later step at the document step's file rather than at a URL. See What Happens After Submit for email steps.
What happens if document generation fails?
If the document service is temporarily unavailable, the step makes up to 5 attempts in total, 30 seconds apart, and then fails: the run follows the step's failure path if it has one, and otherwise ends as failed. A template error is not retried. Running the step again replaces the earlier PDF.
FormAssembly emails the workflow owner when Email the owner when a step fails under Properties → Notifications is on, and it is on unless someone turns it off. A failure route can carry its own notification setting that overrides the switch either way.
A document generation step with no template blocks publishing. Publishing also refuses a row or loop the template no longer declares, a loop with no repeating section, an unfinished condition, and a return-data row with one end.
E-Signature
How do I add an e-signature step?
- In Focus view, click Add step after the document generation step that produces the document.
- Choose E-Signature in the Collect group.
- In the panel, pick the document to sign.
- Set the signer role and the signing page's heading and message.
The document picker offers the generated document of each document step that precedes the sign step, and every file variable of the workflow. It never offers a file a form collected, or another signing step's signed document.
Signer roles
Signing is built from a document generation template tagged for each signer. A template marks each signer's places with numbered tags: {{signature_1}}, {{signer_name_1}}, {{signer_title_1}}, {{signer_initials_1}} and {{signer_date_1}}. A tag with no number belongs to signer 1.
The Signer role picker offers By signing order, which fills the role of the signer's position, or a fixed role number. When the document comes from a document step, the picker lists the roles the template has a signature merge field for. The signer role picks which signature fields a signer fills; it does not say who signs.
For signers one after another, each signer has their own assignment. For signers at the same time, one assignment covers all of them.
Publishing refuses a document with no signature tag, a signing order with no signer 1 tag, and a fixed role number with no tag. Publishing also refuses a signing step that "does not say who signs": wrap the step in an assignment that names the signer, or ask Fai to name the signer with a fixed email address or a launch parameter.
What does the signer see?
The signer opens the signing page on FormAssembly's hosted page, which shows your heading and message above the document.
A bottom bar visits the signer's fields in order, with previous and next, and acts on the current one. A signature is captured in a dialog: drawn, typed or uploaded. A top bar shows progress and offers the download and the decline. Consent is an explicit checkbox, and the consent and sign controls appear only once every field is done.
A signer who cannot sign can decline and give a reason of up to 500 characters. When the signing step sits inside an assignment, a Reassign button sits beside Decline unless the assignment turns reassignment off, and it is offered only until the role is decided. A sign step ends Signed or Declined.
Signing works only on FormAssembly's hosted page: an embedded form shows the step and can decline, but cannot sign.
The signed document and its certificate
Every signer of a document contributes to one shared signed document. Each signature rebuilds the document from the original plus every signature recorded so far, with earlier signatures flattened in and locked, so each signer sees the current version.
The signed document ends with a "Certificate of completion": each signer's role, typed name, email, signing time (UTC), IP address and signature, a consent statement, and a fingerprint of the original document.
Send the signed copy from the parent workflow after every signer has finished, using an email step on the assignment's all-signed path. A copy sent from inside the sub-workflow would be partial.
Approval
How do I set up an approval step?
Selecting an Approval step in the builder still shows "Under construction", so its message and comment settings are set through Fai. Inside an assignment, the assignment panel names the approvers, so you can complete and publish the step without Fai; at the top level, ask Fai to set the approval up. Describe who may approve and what happens after each outcome in the chat box ("Ask Fai") and click the send button.
On the Collect plan, the Approval tile in the Add step menu is locked and opens the upgrade prompt. Publish and Test refuse a workflow with an approval step on the Collect plan. A published workflow with an approval step keeps running after a downgrade, but its edits cannot be published until the plan includes approvals again.
Approval outcomes
An Approval step's outcomes are Approved, Denied and Returned for changes. To branch on an approval's outcome, see Routing & Conditions.
What does the approver see?
The approver's page has Approve and Deny, Request changes when the step routes Returned for changes, and a Comment box when the step allows comments. When a comment is required, the page says "Please add a comment before you decide."
An "Earlier reviews" list shows who decided what and when. Another approver's comment can be hidden, in which case the list reads "Comment not shown".
Who may approve
The approver must be known before the approval's flow starts: when the run starts at the top level, or when the assignment starts inside one, so the address can come from an answer collected earlier in the parent workflow. Publishing refuses an approval that "does not say who may approve": hand the step to an assignment that names the approver, or ask Fai to name the approver with a fixed email address or a launch parameter.
Assignment
An assignment step sends part of the workflow to other people and waits for their answers. Use it to route a signature, an approval or an extra form to someone other than the respondent.
Choosing the assignees
The panel's Assignees section sets who receives the request:
- These emails takes a literal list of addresses.
- From the form takes a text field or string variable from before the step, with email fields listed first. Each address the source resolves to at run time is an assignee.
When several people are named, choose whether everyone gets their own flow or the first to open it takes it. The panel also sets how assignees confirm their identity: a link sent to their email, or signing in with one of the account's enabled identity providers.
Data passed in and returned
Data passed in maps form answers, and outputs of earlier steps such as a decision, a comment or a document, into the assignee's run. A generated document passed in this way is what a sign step inside the assignment signs.
Data returned captures values back into this workflow: the assignee's email, the outcome, the completion time, and the fields, variables and step outputs the assignment holds.
Invitation and cancellation messages
The Invitation section sets the invitation the assignee receives, and the cancellation message an assignee sees if they open the request after the assignment has closed. A blank subject uses FormAssembly's own subject, which names the workflow at send time.
The invitation message must contain the assignment link. Click Insert assignment link to add it. Publishing refuses an invitation message without it.
Routing an assignment's paths
The Routing panel's paths for an assignment, checked top to bottom, compare counts: Responses received, and one count per ending of the assigned steps, each against a number or All assignees. Add one with Add a path. The last path, "When everyone has responded", is always there and is required.
FormAssembly checks the paths each time an assignee finishes. When one matches, it cancels the other assignees' requests.
Publishing refuses a path with no condition, an assignment that could wait forever, an assignment with no assignee, and an invitation message without the assignment link.
An outstanding assignee or signer can be reassigned to someone else from the response page, and assignees can hand on their own request. Managing Responses owns the details.
An assignment on the canvas
In Overview, an assignment's steps sit in a labelled container captioned with the assignee's name, joined to the assignment by a dashed line. In Focus, the assignment shows as a summary card with Open assignment flow, and a breadcrumb takes you back out. You edit the steps inside an assignment like any other step, including their Step settings.
Languages in an assignment
A sub-workflow (an assignment's workflow) carries its own translations, and a person assigned a task sees it in their own browser's language. Form Design owns translation details.
To try the workflow before going live, see Testing & Publishing.
Tips & Troubleshooting
- "Template must be a .docx or .pptx file." You tried to upload a legacy .doc or .ppt template. Open the file in Word or PowerPoint, save it as .docx or .pptx, then upload the new file.
- A mapping row shows No longer exists. The merge field it pointed at is not in the template you uploaded last. Clear the row with its remove control, then map the new rows the replacement template added.
- Publishing says the step "does not say who signs" or "does not say who may approve". The workflow does not name the person before the step's flow starts. Wrap the step in an assignment that names the assignees, or ask Fai to name the signer or approver with a fixed email address or a launch parameter.
- Publishing refuses the assignment's invitation message. The message has no assignment link. Open the Invitation section and click Insert assignment link.
- The signer sees the step in an embedded form but cannot sign. Signing works only on FormAssembly's hosted page. Send signers the hosted link rather than the embed.
- The Approval tile is locked in the Add step menu. Your account is on the Collect plan. Approval steps need the Automate plan or the Enterprise plan; the tile opens the upgrade prompt with the plan you need.
- A document step failed and the run ended as failed. The step had no failure path. Check the workflow's Execution log for the reason, fix the template or mapping, then add a failure path if you want the run to continue.
Was this article helpful?