Workflow Settings & Sharing
How to set a workflow's properties, names and URL, share it with collaborators, and clone, archive or delete it.
How do I open a workflow's settings?
Workflow settings live behind the Properties button in the FormAssembly builder header, to the left of Test. Click Properties and pick a section. FormAssembly opens the properties panel on the right with that section's settings.
Properties covers the whole workflow. To change one step, select the step in Focus view and use Step settings on that step's card.
- Open the workflow in the builder.
- Click Properties in the builder header.
- Choose a section from the list.
- Edit the settings in the panel on the right.
- Click the close control on the panel when you are done.
The panel stays open if you switch from a step's settings to a workflow property: the content changes in place.
What is in each Properties section?
- Themes: picks a published theme for the workflow. For account-authored themes, an Edit this theme link opens that theme in the theme editor in a new tab. See Form Design for creating and editing themes.
- Agent: configures the intake agent that can guide respondents through the form in conversation.
- Access: Holds Public Name (the name respondents see), Custom URL (the ending of the workflow's public URL), URL Parameters (a read-only list of the variables your workflow accepts in its URL), Authentication (whether respondents must sign in), and Spam Protection (the Check for bots when respondents submit switch; see What Respondents See).
- Languages: sets the workflow's Default Language and lists the workflow's Translations. The section does not add or edit a translation; ask Fai to do that. Form Language owns the details.
- Availability: sets the dates and times the workflow accepts responses, and the message respondents see outside that window. An end at or before the start shows a warning in the panel, and the publish check blocks publishing until you fix it.
- Data & Privacy: shows the headings Purge Settings, View Purge Log and Respondent IP Anonymization, which have no settings yet.
- Notifications: holds the Email the owner when a step fails switch (see below).
- Collaboration: lists the workflow's collaborators and names its owner, and is where ownership changes hands.
The availability window only stops new runs from starting: a respondent partway through, a saved response and an assignment all continue after the closing time.
Availability and notification settings apply to the root workflow. A sub-workflow inside an assignment step can carry its own availability window, set through Fai, and that window is not shown or changed here.
To find, clone, archive or delete a workflow, see Building Workflows. To publish a workflow, see Testing & Publishing.
What is the difference between the internal name and the public name?
A workflow has two names. The internal name identifies the workflow for your account: it appears on the Workflows page, in the builder header, in response exports and in emails FormAssembly sends to the owner. The public name is the name respondents see, on the workflow's hosted page, in the intake agent, and in assignment invitation and resume emails.
To change the internal name, click the workflow name in the builder header and type a new one. The change saves at once and creates no draft.
To change the public name, open Properties › Access and edit the Name field under Public Name. The public name saves when you leave the Name field or press Enter; there is no Save button. The public name is part of the draft, so respondents see it after you publish.
Each name is 1 to 255 characters. Clearing either name in the builder puts the previous name back, and a name longer than 255 characters is refused. Changing one name never changes the other, and neither changes the workflow's URL.
Fai can rename a workflow too. If you ask Fai to rename the workflow without saying which name you mean, Fai asks you first.
How do I change a workflow's URL?
The workflow's public URL ends with a slug you can edit under Properties › Access › Custom URL.
- Click Properties, then Access.
- Under Custom URL, type the new ending in URL ending.
- Check the full public URL shown below the field.
- Click Save.
- On a live workflow, confirm the change in the dialog that names the old and new URLs.
The ending is 3 to 100 characters and uses lowercase letters, digits and hyphens, and it cannot start or end with a hyphen. FormAssembly does not correct what you type: an uppercase letter or a space is rejected with a message under the field. The ending must also be unique within your account, and a workflow in the trash still holds its ending.
Changing the URL of a live workflow also needs a role that can publish workflows, because it changes what is live.
Changing the URL takes effect immediately and breaks the old URL. FormAssembly keeps no redirect, so links you already shared, embed snippets on other sites, and resume and invitation links already emailed all stop working, and a respondent part-way through a run in an open tab cannot submit. Change the URL before you share the link widely.
Fai can change the URL too. Ask Fai for the ending you want, and Fai confirms with you before applying it on a live workflow.
How do failure notifications work?
The Email the owner when a step fails switch is under Properties › Notifications. Leave it on to have FormAssembly email the workflow's owner when a step fails during a live run, or turn it off to stop those emails. Test runs never send these emails.
The switch is on unless someone turns it off. The email names the workflow and the step, gives a readable reason for the failure, and counts the failures since the last email, because FormAssembly spaces these emails out instead of sending one per failure.
A failure route on a Connect, Email or Document generation step can carry its own notification setting, authored through Fai or the API, which overrides this switch either way. A route set to notify the owner emails even when the switch is off, and a route set to off sends nothing even when the switch is on. A failure with no route follows the switch, except inside an assignment whose own flow sets a different notification setting through Fai or the API. See What Happens After Submit for how step failures are routed and recorded.
How do I share a workflow's public link?
To copy a workflow's public link or embed snippet, click Share in the builder header once the workflow is published; see Collecting Responses for what the share popup shows and how to embed a form.
How do I share a workflow with a collaborator?
A collaborator is a member, guest or user group of your account that you give access to one workflow, without changing who owns it. Open Properties › Collaboration to manage them in place. The same editor is also available from the Collaborators item in the workflow's row actions.
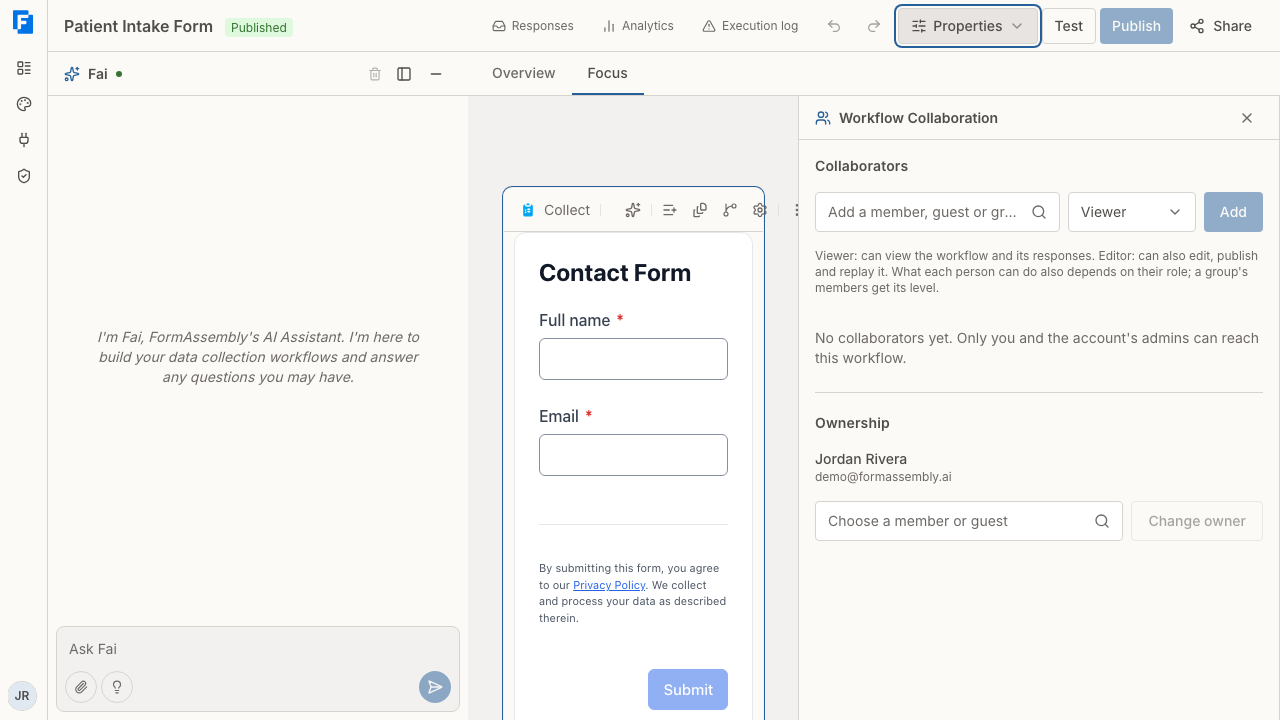
- Click Properties, then Collaboration.
- Under Collaborators, open the person or group picker and search by name or email.
- Pick a person, or a user group (shown with a Group badge).
- Choose the access level for the collaborator.
- Click Add.
Sharing adds access to one workflow only. It never grants a capability the recipient's role withholds: someone whose role cannot edit workflows still cannot edit this one.
What do the access levels mean?
A viewer can read the workflow and its responses. An editor can do everything a viewer can, plus change the workflow, publish and unpublish it, and replay its runs.
An editor collaborator counts as a member of the workflow, so publishing, testing and compliance approval accept connections the editor owns, while they remain in the account, their role can edit workflows and their license allows editing workflows. An editor who is not an account admin cannot change a connector step's action, or the lookup on a form field, whose connection the workflow's owner owns, while the owner is still a member of the workflow; the same holds for an owner who is not an account admin and a step whose connection an editor owns, and either can delete the step or the field; see Connecting Services.
Neither level confers an ownership action. A collaborator cannot delete the workflow, edit or delete a response, transfer ownership, or share the workflow with anyone else.
To change an existing collaborator's level, pick the new level on their row. To remove a collaborator, use the remove control on their row and confirm. Access ends on the collaborator's next request. If a person is reached by both a direct share and a group share, the more permissive of the two applies.
Who can manage collaborators?
Only the workflow's owner or an account admin can manage collaborators, and only when their role includes "Share workflows with members and groups" and "View the member list". Anyone else sees a message instead of the controls, including an editor collaborator who holds both permissions.
How do I change a workflow's owner?
The Ownership section sits below Collaborators in the Collaboration panel. It names the current owner with their name and email, and marks a guest with a Guest badge.
- Click Properties, then Collaboration.
- Under Ownership, choose the new owner from the list of members and guests.
- Click Change owner.
- Confirm in the dialog that names the new owner.
Only the workflow's owner or an account admin can change the owner, and only when their role includes "View the member list". The current owner loses access immediately unless they are an account admin or a collaborator on the workflow, and there is no option to keep them as a collaborator. If the transfer leaves you without edit access, FormAssembly sends you back to the Workflows page. Existing collaborators stay in place, except a share held by the new owner, which ownership replaces.
Tips & Troubleshooting
- A name you typed disappears and the old name comes back. The builder restores the previous name when you clear the field, because neither name can be blank. Type a name of 1 to 255 characters instead.
- The URL ending is rejected with an error under the field. Use 3 to 100 lowercase letters, digits and hyphens, with no hyphen at the start or end. If the ending is already taken in your account, choose another: a workflow in the trash still holds its ending.
- Respondents report a broken link after you changed the URL ending. The old URL is gone and is not redirected. Share the new URL, update embeds, and re-send any invitation or resume emails that used the old one.
- Share is greyed out. Share gives a live URL only for a published workflow, and not while the workflow is archived. To publish a workflow, see Testing & Publishing.
- The owner is not receiving failure emails. Check that Email the owner when a step fails is on under Properties › Notifications, and remember that test runs never send them. A failure route set to off by Fai or the API suppresses the email even when the switch is on.
- You cannot add a collaborator. Ask an account admin to share the workflow or adjust your role, because only the owner or an account admin whose role includes "Share workflows with members and groups" and "View the member list" can add collaborators.
- A person does not appear in the collaborator picker. The picker lists only people with standing in the account: members, and guests whose grant is still active. The workflow's owner is never listed, because ownership already gives full access.
Was this article helpful?